[Archived] Capturing video from a Sony camcorder
Products
Topic
- . Import & export
The following guide explains how to capture HDV video using a Sony HDV camcorder (or deck) and VEGAS or VEGAS Movie Studio Platinum.
DV video capture is covered at the end.
1. Connect your camcorder (or deck) and configure it for recording
- Connect your Sony HDV camera to the FireWire port on your computer (IEEE-1394 cable (i.LINK)).
- Turn the camera on and set it to "Play/Edit" mode.
- For Full HD: Make sure your Sony HDV camera is set to "HDV mode". To check whether your Sony HDV camera is set to HDV mode, open the LCD screen and look to see if "HDV out I-Link" is printed on the screen.
- If the screen is showing "DV out I-Link" instead of "HDV out I-Link", press the "P-MENU" button in the bottom right-hand corner of the screen.
- Go to "MENU" > "STANDARD SET" > "VCR HDV / DV" and press "HDV".
Set "VCR HDV/DV" to"HDV":

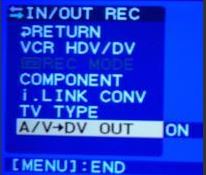
Set "A/V-->DV OUT" to "ON":
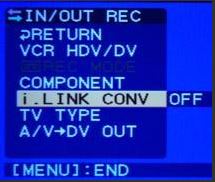
Set "I.Link CONV" to "OFF":
2. Configure the software and start capture
- In the software, go to "File" > "Capture Video", select the internal video capture application.
- Click on "OK".
- You'll need to disable the option "Use external video capture application" under "Options" > "Preferences" > "Video".
- Batch capture cannot be used during HDV capture.
If your camera is not automatically detected, follow these steps:
- Open the "Capture Preferences" menu in the "Capture" dialog and select the "Device" tab.
- Under "Device type", select "IEEE-1394/MPEG2-TS".
- Your clip is saved to the folder specified on the "Disk Management" tab of the Capture Preferences dialog. The default path is displayed in the Capture folder box in the Video Capture window.
- To change the path, select it and click the red X icon in the upper right-hand corner of the window.
- Click "Add Folder" to specify a new path.
- When you are finished selecting a new path, click "Apply", followed by "OK".
3. DV video capture with an HDV camera and VEGAS or VEGAS Movie Studio Platinum
Sony HDV cameras have a built-in feature which lets you downsample HDV source material to DV.
- To turn this feature on, open the LCD screen on your camera and press "P-MENU". Then, go to "MENU" > "STD.EINST" > "I.LINK CONV"> "ON HDV" > "DV".
- To capture DV video with VEGAS or VEGAS Movie Studio Platinum, you need to use the external video capture application.
- In the software, go to "File" > "Capture Video".
- You can enable the external video capture application by going to "Options" > "Preferences" > "Video" > "Use external video capture application".
- Once you've enabled the option "Use external video capture application" the software will automatically detect your camera.