Zooming to a specific spot on jpg then holding that spot for x seconds

FF22 wrote on 3/28/2020, 10:24 PM

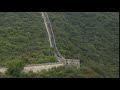
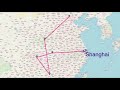
I have included two sets of jpg images. In both of them I would like to ZOOM in on a portion of the image and then when it gets to the full zoom level hold on that part of the image for x number of seconds. Where x would vary. In a scenic shot, just holding long enough to enjoy the larger image. In the second example, I'd like to hold for a sufficient length of time so one might actually be able to read the text that has been zoomed. I am trying to have fun rather than just merely show the final enlarged image.

I have been somewhat accomplishing this making three copies of the initial image, using zoom on the second copy (doing a smooth fade between copy 1 and 2 and then trying to approximate the "top" zoom and using Section on the 3rd copy. I know that there has to be an easier or better way using curves?


If there's a specific tutorial, all the better. I've looked around and I don't think I found anything specific.


MAGIX Movie Edit Pro Plus
Version 19.0.2.58 [UDP3]

MAGIX Movie Edit Pro Plus
Version 19.0.2.58 [UDP3]

Svstem Specs
CPU Intel Core i5 4690
GPU NVIDIA GeF0rce GTX 750 Ti
Motherboard ASUSTeK COMPUTER INC. Z97-A
RAM Kingston KHX1600C10D3/8G DDR3

Crucial Techneloqv CT102464BD160B.C1 DDR3
Storage
ST1000DM003—1ER162
CT1000MIX500SSD1
Seagate BUP BK SCSI Disk Device
Audio
N/A

CPU Details:
Manufacturer Intel
Code Name Haswell
Default Clock Speed 3500Mhz
Current Clock Speed 3796M|hz
Socket Type Socket 1150 LGA
TDP 84


Comments

CubeAce wrote on 3/29/2020, 3:18 AM

@FF22

I think one of your performance problems is loading full sized images rather than images that have been batch processed to the export frame size of the project. A typical frame from a 4K video clip would be around 4MP. Having any image that isn't the set resolution of a project means each frame has to be rendered in real time.

If you need to load larger images than the project settings at least reduce the quality by compression first as the differences when converted to video will hardly be noticed if the image as 80% of the original information.

That could be done as a batch process in most photo editing packages.

There are automated zoom settings / patterns in the Premium version of MEP but you would still probably be better off doing it manually for more precise control.

Ray.

Last changed by CubeAce on 3/29/2020, 3:20 AM, changed a total of 1 times.


Windows 10 Enterprise. Version 22H2 OS build 19045.5737

Direct X 12.1 latest hardware updates for Western Digital hard drives.

Asus ROG STRIX Z390-F Gaming motherboard Rev 1.xx with Supreme FX inboard audio using the S1220A code. Driver No 6.0.8960.1 Bios version 1401

Intel i9900K Coffee Lake 3.6 to 5.1GHz CPU with Intel UHD 630 Graphics .Driver version Graphics Driver 31.0.101.2135 for 7th-10th Gen Intel® with 64GB of 3200MHz Corsair DDR4 ram.

1000 watt EVGA modular power supply.

1 x 250GB Evo 970 NVMe: drive for C: drive backup 1 x 1TB Sabrent NVMe drive for Operating System / Programs only. 1X WD BLACK 1TB internal SATA 7,200rpm hard drives.1 for internal projects, 1 for Library clips/sounds/music/stills./backup of working projects. 1x500GB SSD current project only drive, 2x WD RED 2TB drives for latest footage storage. Total 31TB of 10 external WD drives for backup.

ASUS NVIDIA GeForce RTX 3060 12GB. nVidia Studio driver version 572.60 - 3584xCUDA cores Direct X 12.1. Memory interface 192bit Memory bandwidth 360.05GB/s 12GB of dedicated GDDR6 video memory, shared system memory 16307MB PCi Express x8 Gen3. Two Samsung 27" LED SA350 monitors with 5000000:1 contrast ratios at 60Hz.

Running MMS 2024 Suite v 23.0.1.182 (UDP3) and VPX 14 - v20.0.3.180 (UDP3)

M Audio Axiom AIR Mini MIDI keyboard Ver 5.10.0.3507

VXP 14, MMS 2024 Suite, Vegas Studio 16, Vegas Pro 18, Vegas Pro 21,Cubase 4. CS6, NX Studio, Mixcraft 9 Recording Studio. Mixcraft Pro 10 Studio. CS6 and DXO Photolab 8, OBS Studio.

Audio System 5 x matched bi-wired 150 watt Tannoy Reveal speakers plus one Tannoy 15" 250 watt sub with 5.1 class A amplifier. Tuned to room with Tannoy audio application.

Ram Acoustic Studio speakers amplified by NAD amplifier.

Rogers LS7 speakers run from Cambridge Audio P50 amplifier

Schrodinger's Backup. "The condition of any backup is unknown until a restore is attempted."

browj2 wrote on 3/29/2020, 8:14 AM

@FF22

Hi,

To do this, you need to understand keyframes. There is a quick way to get going by using Effects>View/Animation>Camera/Zoom shot. There is a good chapter in the manual about this.

With a video or photo selected on the timeline, adjusted to the duration that you want but at least 5 seconds long, you have 2 main choices, zoom out from a section or zoom in to a section.

From section: select the clip, click on From section and a dashed box will appear in the preview monitor, just like the image below. Make sure that Preview is showing in the dialogue box which means that you are in edit mode.

Move it with the mouse and resize using the corner handles. Two keyframes are created in the keyframe area, the first one will be the size/position of the rectangle that you moved/resized; the second will be the original size. The default is Over full duration. Click on 2 second edge and you'll see the two keyframes move in. You can adjust the keyframes by dragging them. Put the playback marker at the beginning of the clip and click on Play. You'll see that it starts zoomed in and then zooms out.

To section just does the opposite - starts zoomed out (100%) and zooms in to your rectangle. Now you can start playing with the other things, like the duration. Be sure to delete the current effects - pop down the menu at the top right or to the right of the text in the keyframe area.

After doing the first one, switch to Size/Position and you'll see that the Position, Size and Zoom parameters change as you scrub along the timeline when you release the mouse.

You can do the same thing here manually by yourself. Delete the previous effect. Set the playback marker, click on the +keyframe button just above the keyframe area and a keyframe will be placed. Move along the timeline. Adjust any parameter, like zoom, and a second keyframe will be placed. If you want to hold that for a few seconds, move along the timeline and click on the +keyframe button and a third keyframe will be added with the same parameters. Etc. Look at the values of the parameters of the various keyframes - Size, Position, Zoom as you move the playback marker to along the timeline. So, you can have the image flying in, rotating and zooming using keyframes.

John CB

John C.B.

VideoPro X(16); Movie Studio 2025 Platinum; Music Maker 2025 Premium Edition; Samplitude Pro X8 Suite; see About me for more.

Desktop System - Windows 10 Pro 22H2; MB ROG STRIX B560-A Gaming WiFi; Graphics Card Zotac Gaming NVIDIA GeForce RTX-3060, PS; Power supply EVGA 750W; Intel Core i7-10700K @ 3.80GHz (UHD Graphics 630); RAM 32 GB; OS on Kingston SSD 1TB; secondary WD 2TB; others 1.5TB, 3TB, 500GB, 4TB, 5TB, 6TB, 8TB, 12TB, 14TB; three monitors - HP 25" main, LG 4K 27" second, HP 27" third; Casio WK-225 piano keyboard; M-Audio M-Track USB mixer.

Notebook - Microsoft Surface Pro 4, i5-6300U, 8 GB RAM, 256 SSD, W10 Pro 20H2.

YouTube Channel: @JCBrownVideos

FF22 wrote on 3/29/2020, 9:59 AM

By George, I think he's got it?? (that is, if the youtube video inserts)


MAGIX Movie Edit Pro Plus
Version 19.0.2.58 [UDP3]

Svstem Specs
CPU Intel Core i5 4690
GPU NVIDIA GeF0rce GTX 750 Ti
Motherboard ASUSTeK COMPUTER INC. Z97-A
RAM Kingston KHX1600C10D3/8G DDR3

Crucial Techneloqv CT102464BD160B.C1 DDR3
Storage
ST1000DM003—1ER162
CT1000MIX500SSD1
Seagate BUP BK SCSI Disk Device
Audio
N/A

CPU Details:
Manufacturer Intel
Code Name Haswell
Default Clock Speed 3500Mhz
Current Clock Speed 3796M|hz
Socket Type Socket 1150 LGA
TDP 84


browj2 wrote on 3/29/2020, 10:03 AM

Looks good!

John C.B.

VideoPro X(16); Movie Studio 2025 Platinum; Music Maker 2025 Premium Edition; Samplitude Pro X8 Suite; see About me for more.

Desktop System - Windows 10 Pro 22H2; MB ROG STRIX B560-A Gaming WiFi; Graphics Card Zotac Gaming NVIDIA GeForce RTX-3060, PS; Power supply EVGA 750W; Intel Core i7-10700K @ 3.80GHz (UHD Graphics 630); RAM 32 GB; OS on Kingston SSD 1TB; secondary WD 2TB; others 1.5TB, 3TB, 500GB, 4TB, 5TB, 6TB, 8TB, 12TB, 14TB; three monitors - HP 25" main, LG 4K 27" second, HP 27" third; Casio WK-225 piano keyboard; M-Audio M-Track USB mixer.

Notebook - Microsoft Surface Pro 4, i5-6300U, 8 GB RAM, 256 SSD, W10 Pro 20H2.

YouTube Channel: @JCBrownVideos

FF22 wrote on 3/29/2020, 10:15 AM

Looks good!

It could use some refinement. And frankly, I'm not sure how I did it. 😁

I went to Camera zoom or whatever. Added a keyframe marker at the beginning. Move to the end of the jpg and zoomed/positioned where I wanted. Upped the duration so that the zoom is not too fast (vertigo inducing). But then.... It ended on the zoom but moved on. I think I then dragged the right end of the image which extended the time at the end?? In other words, I did not want to just extended the duration of the zoom but hold on the zoomed portion for a bit. I guess I need to recheck my steps (screen recorder might have been helpful at that point).

Well, it is another raining day in Seattle, so plenty of time to experiment.


Thanks a bunch.

MAGIX Movie Edit Pro Plus
Version 19.0.2.58 [UDP3]

Svstem Specs
CPU Intel Core i5 4690
GPU NVIDIA GeF0rce GTX 750 Ti
Motherboard ASUSTeK COMPUTER INC. Z97-A
RAM Kingston KHX1600C10D3/8G DDR3

Crucial Techneloqv CT102464BD160B.C1 DDR3
Storage
ST1000DM003—1ER162
CT1000MIX500SSD1
Seagate BUP BK SCSI Disk Device
Audio
N/A

CPU Details:
Manufacturer Intel
Code Name Haswell
Default Clock Speed 3500Mhz
Current Clock Speed 3796M|hz
Socket Type Socket 1150 LGA
TDP 84


CubeAce wrote on 3/29/2020, 10:30 AM

@FF22

Hi. I do similar to zoom but drag the timeline cursor to the next point and then in the preview window drag the image across to the zoomed position I want then drag the timeline cursor to the next point and repeat moving the image position. You can of course do much more but it's easy to go overboard as I frequently do 😂

Here's an example of mine as I tend to mix video with still clips.

Last changed by CubeAce on 3/29/2020, 10:31 AM, changed a total of 1 times.


Windows 10 Enterprise. Version 22H2 OS build 19045.5737

Direct X 12.1 latest hardware updates for Western Digital hard drives.

Asus ROG STRIX Z390-F Gaming motherboard Rev 1.xx with Supreme FX inboard audio using the S1220A code. Driver No 6.0.8960.1 Bios version 1401

Intel i9900K Coffee Lake 3.6 to 5.1GHz CPU with Intel UHD 630 Graphics .Driver version Graphics Driver 31.0.101.2135 for 7th-10th Gen Intel® with 64GB of 3200MHz Corsair DDR4 ram.

1000 watt EVGA modular power supply.

1 x 250GB Evo 970 NVMe: drive for C: drive backup 1 x 1TB Sabrent NVMe drive for Operating System / Programs only. 1X WD BLACK 1TB internal SATA 7,200rpm hard drives.1 for internal projects, 1 for Library clips/sounds/music/stills./backup of working projects. 1x500GB SSD current project only drive, 2x WD RED 2TB drives for latest footage storage. Total 31TB of 10 external WD drives for backup.

ASUS NVIDIA GeForce RTX 3060 12GB. nVidia Studio driver version 572.60 - 3584xCUDA cores Direct X 12.1. Memory interface 192bit Memory bandwidth 360.05GB/s 12GB of dedicated GDDR6 video memory, shared system memory 16307MB PCi Express x8 Gen3. Two Samsung 27" LED SA350 monitors with 5000000:1 contrast ratios at 60Hz.

Running MMS 2024 Suite v 23.0.1.182 (UDP3) and VPX 14 - v20.0.3.180 (UDP3)

M Audio Axiom AIR Mini MIDI keyboard Ver 5.10.0.3507

VXP 14, MMS 2024 Suite, Vegas Studio 16, Vegas Pro 18, Vegas Pro 21,Cubase 4. CS6, NX Studio, Mixcraft 9 Recording Studio. Mixcraft Pro 10 Studio. CS6 and DXO Photolab 8, OBS Studio.

Audio System 5 x matched bi-wired 150 watt Tannoy Reveal speakers plus one Tannoy 15" 250 watt sub with 5.1 class A amplifier. Tuned to room with Tannoy audio application.

Ram Acoustic Studio speakers amplified by NAD amplifier.

Rogers LS7 speakers run from Cambridge Audio P50 amplifier

Schrodinger's Backup. "The condition of any backup is unknown until a restore is attempted."

FF22 wrote on 3/29/2020, 10:50 AM

@FF22

Hi. I do similar to zoom but drag the timeline cursor to the next point and then in the preview window drag the image across to the zoomed position I want then drag the timeline cursor to the next point and repeat moving the image position. You can of course do much more but it's easy to go overboard as I frequently do 😂

Here's an example of mine as I tend to mix video with still clips.

Fun clip. I will admit I don't have anywhere near that much personal editing horsepower. Show picture, maybe show more extended, try zooming on it or panning across it, throwing in a title, move on to next image.

MAGIX Movie Edit Pro Plus
Version 19.0.2.58 [UDP3]

Svstem Specs
CPU Intel Core i5 4690
GPU NVIDIA GeF0rce GTX 750 Ti
Motherboard ASUSTeK COMPUTER INC. Z97-A
RAM Kingston KHX1600C10D3/8G DDR3

Crucial Techneloqv CT102464BD160B.C1 DDR3
Storage
ST1000DM003—1ER162
CT1000MIX500SSD1
Seagate BUP BK SCSI Disk Device
Audio
N/A

CPU Details:
Manufacturer Intel
Code Name Haswell
Default Clock Speed 3500Mhz
Current Clock Speed 3796M|hz
Socket Type Socket 1150 LGA
TDP 84


browj2 wrote on 3/29/2020, 11:01 AM

@FF22

Increase the duration and drag the keyframes to adjust to what you want. MEP tweens from one kf to another, normally linearly. If you want to start slowly, speed up and then slow down before the next kf, click on the button to the right of the kf text. See the circle in the image. This will give you an automatic Bézier curve. VPX has another one that will give you a manual Bézier curve with adjustment handles.

In the image below, I have 2 kf's going from a zoom of 100 to 200. I opened the Size/Position popdown* on the kf using the down arrow at the left (in the circle in the image). I clicked on the show curve for the width - the curve shows in the object on the timeline, and I clicked on the Bézier button so you can see the curve is not a straight line.

In the rectangle are the tools. Look at what they do.

Popdown the menu at the right of the kf text to see other options.

There is a dialogue that helps make adjustments to kf's.

* Many keyframes are rolled up into 1 main one. Click on the down menu arrow to see the detailed keyframes.

John CB

John C.B.

VideoPro X(16); Movie Studio 2025 Platinum; Music Maker 2025 Premium Edition; Samplitude Pro X8 Suite; see About me for more.

Desktop System - Windows 10 Pro 22H2; MB ROG STRIX B560-A Gaming WiFi; Graphics Card Zotac Gaming NVIDIA GeForce RTX-3060, PS; Power supply EVGA 750W; Intel Core i7-10700K @ 3.80GHz (UHD Graphics 630); RAM 32 GB; OS on Kingston SSD 1TB; secondary WD 2TB; others 1.5TB, 3TB, 500GB, 4TB, 5TB, 6TB, 8TB, 12TB, 14TB; three monitors - HP 25" main, LG 4K 27" second, HP 27" third; Casio WK-225 piano keyboard; M-Audio M-Track USB mixer.

Notebook - Microsoft Surface Pro 4, i5-6300U, 8 GB RAM, 256 SSD, W10 Pro 20H2.

YouTube Channel: @JCBrownVideos

CubeAce wrote on 3/29/2020, 11:05 AM

@FF22

Ha!

I did that on my old system using an early i5 processor with no internal GPU and no SSDs. It just took hours to render. I only upgraded to my new motherboard processor setup in September/ October. I had MEP just over a year I think before my old PC collapsed. I even had to keep an eye on the CPU temperature and pause rendering to stop it overheating on some longer projects. I admit everything is much easier now but I did quite a bit of editing on my old machine.

Ray.


Windows 10 Enterprise. Version 22H2 OS build 19045.5737

Direct X 12.1 latest hardware updates for Western Digital hard drives.

Asus ROG STRIX Z390-F Gaming motherboard Rev 1.xx with Supreme FX inboard audio using the S1220A code. Driver No 6.0.8960.1 Bios version 1401

Intel i9900K Coffee Lake 3.6 to 5.1GHz CPU with Intel UHD 630 Graphics .Driver version Graphics Driver 31.0.101.2135 for 7th-10th Gen Intel® with 64GB of 3200MHz Corsair DDR4 ram.

1000 watt EVGA modular power supply.

1 x 250GB Evo 970 NVMe: drive for C: drive backup 1 x 1TB Sabrent NVMe drive for Operating System / Programs only. 1X WD BLACK 1TB internal SATA 7,200rpm hard drives.1 for internal projects, 1 for Library clips/sounds/music/stills./backup of working projects. 1x500GB SSD current project only drive, 2x WD RED 2TB drives for latest footage storage. Total 31TB of 10 external WD drives for backup.

ASUS NVIDIA GeForce RTX 3060 12GB. nVidia Studio driver version 572.60 - 3584xCUDA cores Direct X 12.1. Memory interface 192bit Memory bandwidth 360.05GB/s 12GB of dedicated GDDR6 video memory, shared system memory 16307MB PCi Express x8 Gen3. Two Samsung 27" LED SA350 monitors with 5000000:1 contrast ratios at 60Hz.

Running MMS 2024 Suite v 23.0.1.182 (UDP3) and VPX 14 - v20.0.3.180 (UDP3)

M Audio Axiom AIR Mini MIDI keyboard Ver 5.10.0.3507

VXP 14, MMS 2024 Suite, Vegas Studio 16, Vegas Pro 18, Vegas Pro 21,Cubase 4. CS6, NX Studio, Mixcraft 9 Recording Studio. Mixcraft Pro 10 Studio. CS6 and DXO Photolab 8, OBS Studio.

Audio System 5 x matched bi-wired 150 watt Tannoy Reveal speakers plus one Tannoy 15" 250 watt sub with 5.1 class A amplifier. Tuned to room with Tannoy audio application.

Ram Acoustic Studio speakers amplified by NAD amplifier.

Rogers LS7 speakers run from Cambridge Audio P50 amplifier

Schrodinger's Backup. "The condition of any backup is unknown until a restore is attempted."

terrypin wrote on 3/29/2020, 3:00 PM

This tutorial I made some years ago about using key frames might also be helpful.


FF22 wrote on 3/29/2020, 4:59 PM

This tutorial I made some years ago about using key frames might also be helpful.


THANK YOU VERY MUCH. A wonderful example of zooming and panning. So you duplicate some keyframe markers to keep the "zoom level/pan" fixed at that spot for x numbers of seconds (frames) and then move on to allow it to pan/zoom out or in again.

Now, I just have to play with some of my images. I probably should browse through my project and find where I've tried with my clumsy method (3 copies, zoom middle, section last) and just grab some of them as separate projects so I don't have this huge project. Then save each and then later incorporate/import them.


MAGIX Movie Edit Pro Plus
Version 19.0.2.58 [UDP3]

Svstem Specs
CPU Intel Core i5 4690
GPU NVIDIA GeF0rce GTX 750 Ti
Motherboard ASUSTeK COMPUTER INC. Z97-A
RAM Kingston KHX1600C10D3/8G DDR3

Crucial Techneloqv CT102464BD160B.C1 DDR3
Storage
ST1000DM003—1ER162
CT1000MIX500SSD1
Seagate BUP BK SCSI Disk Device
Audio
N/A

CPU Details:
Manufacturer Intel
Code Name Haswell
Default Clock Speed 3500Mhz
Current Clock Speed 3796M|hz
Socket Type Socket 1150 LGA
TDP 84


Scenestealer wrote on 3/29/2020, 5:30 PM

@FF22

I think I then dragged the right end of the image which extended the time at the end?? In other words, I did not want to just extended the duration of the zoom but hold on the zoomed portion for a bit.

Dragging the right end extends the length of the clip without increasing the position of the already laid down KF's. To extend the clip and increase the temporal distance between the KF's ie. slow down the effect, you would drag the rt end out then click the down triangle adjacent to the relevant effect in the key framer and select "combine effects curve with object length"

Peter

System Specs: Intel 6th Gen i7 6700K 4Ghz O.C.4.6GHz, Asus Z170 Pro Gaming MoBo, 16GB DDR4 2133Mhz RAM, Samsung 850 EVO 512GB SSD system disc WD Black 4TB HDD Video Storage, Nvidia GTX1060 OC 6GB, Win10 Pro 2004, MEP2016, 2022 (V21.0.1.92) Premium and prior, VPX7, VPX12 (V18.0.1.85). Microsoft Surface Pro3 i5 4300U 1.9GHz Max 2.6Ghz, HDGraphics 4400, 4GB Ram 128GB SSD + 64GB Strontium Micro SD card, Win 10Pro 2004, MEP2015 Premium.

FF22 wrote on 3/29/2020, 5:35 PM

@FF22

I think I then dragged the right end of the image which extended the time at the end?? In other words, I did not want to just extended the duration of the zoom but hold on the zoomed portion for a bit.

Dragging the right end extends the length of the clip without increasing the position of the already laid down KF's. To extend the clip and increase the temporal distance between the KF's ie. slow down the effect, you would drag the rt end out then click the down triangle adjacent to the relevant effect in the key framer and select "combine effects curve with object length"

Peter

Now where am I going to store this little morsel outside of the vacuum of my skull so that I can remember and find it. That tip could be very useful.

MAGIX Movie Edit Pro Plus
Version 19.0.2.58 [UDP3]

Svstem Specs
CPU Intel Core i5 4690
GPU NVIDIA GeF0rce GTX 750 Ti
Motherboard ASUSTeK COMPUTER INC. Z97-A
RAM Kingston KHX1600C10D3/8G DDR3

Crucial Techneloqv CT102464BD160B.C1 DDR3
Storage
ST1000DM003—1ER162
CT1000MIX500SSD1
Seagate BUP BK SCSI Disk Device
Audio
N/A

CPU Details:
Manufacturer Intel
Code Name Haswell
Default Clock Speed 3500Mhz
Current Clock Speed 3796M|hz
Socket Type Socket 1150 LGA
TDP 84


FF22 wrote on 3/29/2020, 5:38 PM

This tutorial I made some years ago about using key frames might also be helpful.


Terry: I saw your animated travel route. I'd made this one ages ago before leaving the project be until this last week

MAGIX Movie Edit Pro Plus
Version 19.0.2.58 [UDP3]

Svstem Specs
CPU Intel Core i5 4690
GPU NVIDIA GeF0rce GTX 750 Ti
Motherboard ASUSTeK COMPUTER INC. Z97-A
RAM Kingston KHX1600C10D3/8G DDR3

Crucial Techneloqv CT102464BD160B.C1 DDR3
Storage
ST1000DM003—1ER162
CT1000MIX500SSD1
Seagate BUP BK SCSI Disk Device
Audio
N/A

CPU Details:
Manufacturer Intel
Code Name Haswell
Default Clock Speed 3500Mhz
Current Clock Speed 3796M|hz
Socket Type Socket 1150 LGA
TDP 84